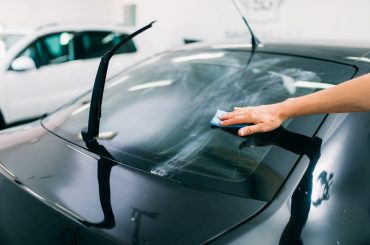
Precut window tint films are designed with CAD designed software. Since computer-aided technology is used, these are created to be 100% accurate for each piece. They come in standard sizes and shapes, depending on your vehicle type. If you are planning to install a precut car window tint film, then with proper research-based knowledge and enough patience, you can get good results as that of professional work.
Even though the manufacturers can determine the accuracy and increase the quality of their DIY precut window tint kits, there are some other factors that you should be concerned about. Let’s start with the identification of the advantages of precut window tints.
Table of Contents
Advantages of Precut Window Tint
The most important advantage would be the low cost of precut window films. The DIY kits are highly cost effective. If you seek a professional technician for this task, the cost of labor would be added to your expenses. It could even increase with the experience and business name of the installer. Therefore, you can get a precut window film for an affordable price.
The other advantage is time management. If you are planning to install a window film on your own, then you can do it at whatever time you prefer. You can adjust the work with your schedule and choose a good time slot to carry out the work. You do not need to adapt yourself to the tight schedules of window film installers.
Disadvantages of Precut Window Tint
One main disadvantage would be the quality of your work if you do it wrong. Reputed professionals are less likely to mess their work and even if they do, they would come up with a solution or offer you free re-installation of film. The DIY kits would have a limited warranty and if you mess it up by any chance, you would have no option other than to remove the tint and replace it with a new one. Therefore, there would be a higher guarantee with professional work. If you need any help regarding the removal of such tint or to remove your old tint, then please refer to How to Remove Window Tint.
Professional installation films would come with a wide range of design and type options. You might not have the same choices in the precut series. If you don’t like what they have, as the best pre cut window tint, then you would not have any other precut options. However, professionals would be keen to offer the best they have and do the best they can to keep their customers happy. They would offer a hassle-free installation and be at your service while answering all your questions that the precut film’s installation guide cannot provide. So, all you would need is to choose what you want and simply sit back and rest while they do the work for you.
If you make the wrong purchase, sometimes you would not be able to return the films based on the seller. Returning will never be accepted if you have attempted to install the tint. Therefore, this is a disadvantage where you should be extra careful when purchasing. To learn more about the types of window tints available, refer to Types of Window Tints.
Recommendations for Precut Window Tint Installation
There are some recommendations before you start your installation. First, a shady area is recommended for the window film installation where the temperature would be around 15 to 30 degrees Celsius whether the weather would not be cold as freezing for at least until 3 days. The tint should not be exposed to direct sunlight before curing properly.
There is a third brake light cut for the back window. So, to get the best results, it is recommended to remove the third brake light before installation. Also, make sure to clean the windows well inside out in order to remove any debris that might cause contamination. Make sure to check along with the door panels and rubber seals on the windows as well.
It is highly recommended to use a heat gun for heat shrinking each window before you start the installation. This is especially for curved windows such as the back window. The heat gun would also help in the process of installation for removing air bubbles and air fingers.
Throughout the installation, keep the window about 1/8 of an inch lower from the top of the frame. This is to tuck the tint behind the window gaskets and weather stripping.
Precut Window Tint Installation Procedure
Since the window tint manufacturers are not responsible and have no control over the process of installation, let’s identify how you can do this accurately.
- First of all, make sure to peel away the excess tint from the precut pieces. This would leave the required tinted pieces on the clear liner. If you do this vice versa, by taking off the required precut pieces without removing the excess part, then you would easily tear off the pieces and damage the film. You can do this by first cutting an edge of the excess film part and then peeling along the edge of the liner. When you peel off these extra parts, make sure to wet the adhesive side of the tint using soapy water so that even if the tint touches itself, the film would not get adhered.
- If you have trouble figuring out the liner side, pull apart a corner of the film using two pieces of tape. The protective layer will be the clear liner.
- Spray the soap solution on both the glass and the film. Make sure to spray the solution onto both sides of the film, so that there will be lubrication.
- Apply the wet precut pieces on the inside of the windows and slide them into position.
- Hold the film by a middle point and squeeze out the excess solution in between the glass and film using a hard edge or a squeegee. Do this carefully until there are no air pockets or air fingers left in the film.
Learn more on this DIY method from How to Tint Car Windows.
How to Deal With a Curved Back Glass When Installing
This would be a great problem if you have a back glass that is curved. The answer for this would be heat shrinking. You can start the procedure by spraying the soap solution on the outside of the glass. Bring all the excess film into the air fingers that are on the top and bottom of the window. Quickly pass the heat gun over this air finger and you would see that the film reacts. Then gently smooth that area using a hard card wrapped in a paper towel. Repeat this procedure for all the air fingers that appear while the process is being continued. After the film is completely smooth and flat, repeat the same using a hard edge without the paper towel.
Are Precut Ceramic Window Tints Available?
Yes, there are precut ceramic window tints available, that are customized according to the vehicle-based requirements. Every application has been tested and confirmed to fit the vehicles and no cutting will be required. However, heat shrinking will be required according to the curvature of windows before the installation. Get more details about ceramic tint from Regular vs. Ceramic Window Tint.


